
Nango handles the OAuth dance, the token refresh and the syncs. What it does not do is create the Salesforce side of the connection for you. Every Salesforce integration in Nango needs your own client ID and secret, and on Salesforce those live in an external client app that somebody has to build first.
Creating that app is what this guide covers. If you only ever connect your own org, it is a short setup. If you need to ship the integration to customers, Salesforce also has you package the app so they can install it in their own orgs. Either way you end up with the same thing: a client ID and secret to hand back to Nango.
This guide walks through provisioning the app, collecting the client ID and secret, and pasting them into Nango, in about two minutes.
Why Nango asks for your own client ID and secret
Nango is deliberately not a middleman for your credentials. For anything heading to production you register your own OAuth app with the provider and hand Nango the keys, so the connection belongs to you rather than to a shared developer app.
On Salesforce that OAuth app is an external client app. It holds the scopes, the redirect URLs, and the client ID and secret Nango signs in with. Salesforce calls the client ID the consumer key, which is the first place people get confused when copying values between two dashboards.
Why it has to be an external client app, not a connected app
Nango's Salesforce guide is titled "Why External Client Apps only" for a reason. Salesforce has retired the connected app as the way to build new integrations:
- In Winter '26, creating connected apps through the UI was turned off by default on new orgs.
- From Spring '26, that capability cannot be re-enabled without approval from Salesforce Support.
Existing connected apps keep working, and App Manager offers a "Migrate to External Client App" button for eligible ones, after which the old app becomes read only and all changes happen on the new one. But if you are wiring up Nango today, the external client app is the only sensible starting point.
Step 1: Copy the callback URL from Nango
Nango's default callback is https://api.nango.dev/oauth/callback, and it is documented on the Salesforce setup page.
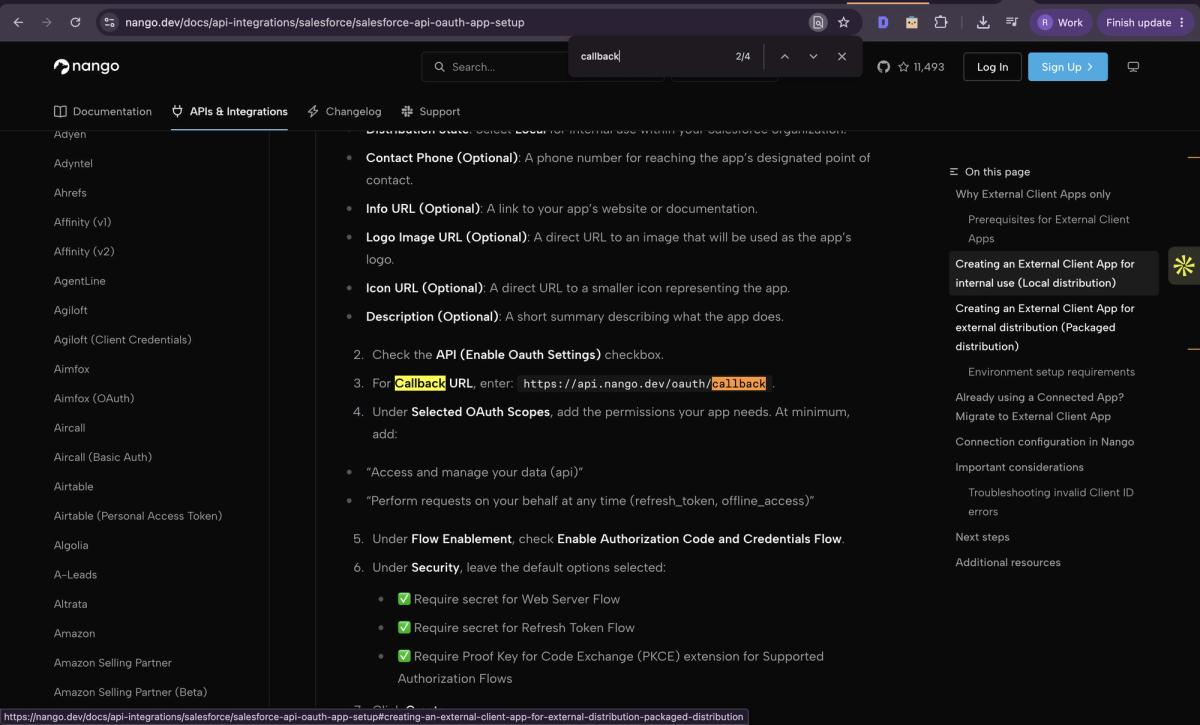
Check your own integration settings rather than assuming, because Nango also supports a custom callback on your own domain. That is the one you want in production, since the Salesforce consent screen your customers see then shows your domain instead of Nango's.
Set the custom callback before real users connect. Changing it later means updating both the Salesforce app and Nango, and authorization breaks for anyone who tries in between.
Copy the value. Do not retype it. Salesforce compares the redirect URL on the authorization request against the stored one character for character, and a trailing slash is enough to fail it.
Step 2: Start your external client app
Go to the external client app provisioner and enter your work email. There is no password to create and no account form ahead of the product.
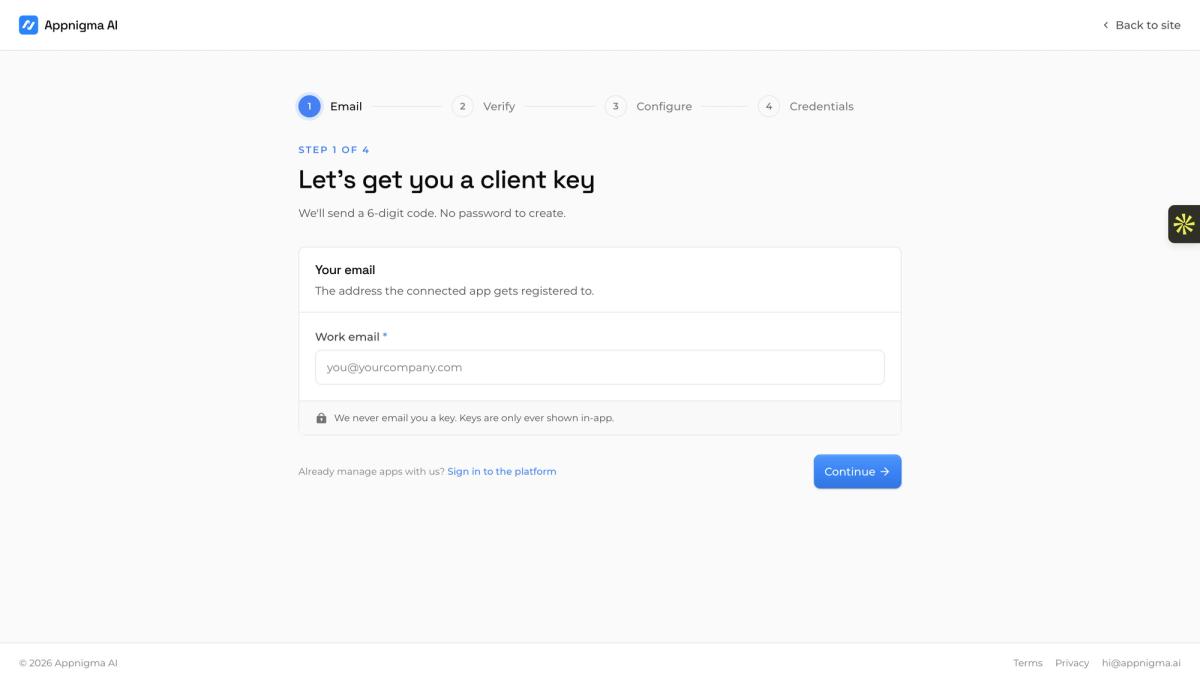
Step 3: Verify your email
A six digit code arrives by email. Keys are never emailed to you and are only ever shown in the app, which is the behaviour you want from anything handling OAuth secrets.
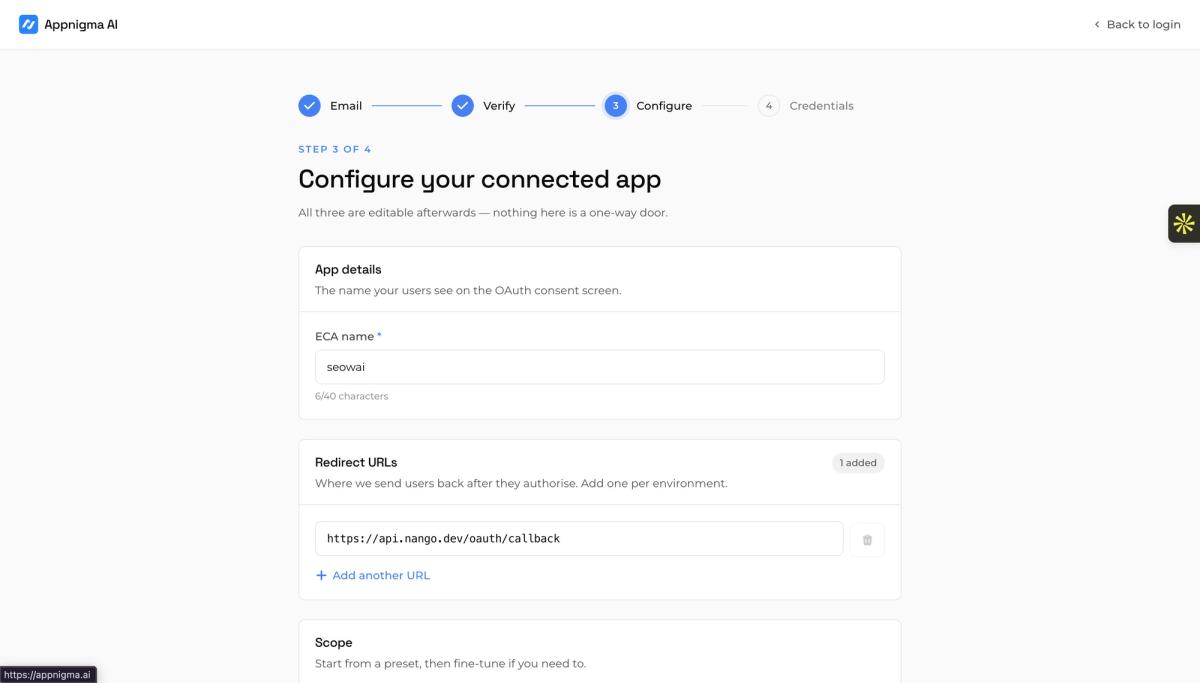
Step 4: Name the app and add the callback URL
The ECA name is not just a label. It is the name your users see on the OAuth consent screen, so pick something a customer will recognise as yours rather than test app 2. You get 40 characters.
Then paste the callback URL from Step 1 into the redirect URL field. You can add more than one, and the guidance in the form is to add one per environment, which is exactly how you keep staging and production on the same app. Every field here stays editable afterwards, so none of it is a one way door.
Step 5: Pick your scopes
Three scopes ship with every app: api, refresh_token and web. The other ten are yours to add, as a preset or one at a time.
| Preset | Count | Scopes added | Use it when |
|---|---|---|---|
| Data only | 3 | api, refresh_token, web | Backend syncs and scheduled jobs. Moves records and refreshes its own tokens, never learns who the user is |
| Data plus sign-in | 7 | Adds openid, profile, email, offline_access | People sign in to your app with their Salesforce account. The common choice |
| Full access | 13 | Adds address, phone, content, custom_permissions, wave_api, eclair_api | Fastest to get moving, worth narrowing before production |
Nango's own minimum is api plus refresh_token or offline_access. Data plus sign-in covers that and adds the identity scopes, which is why it is the default recommendation here.
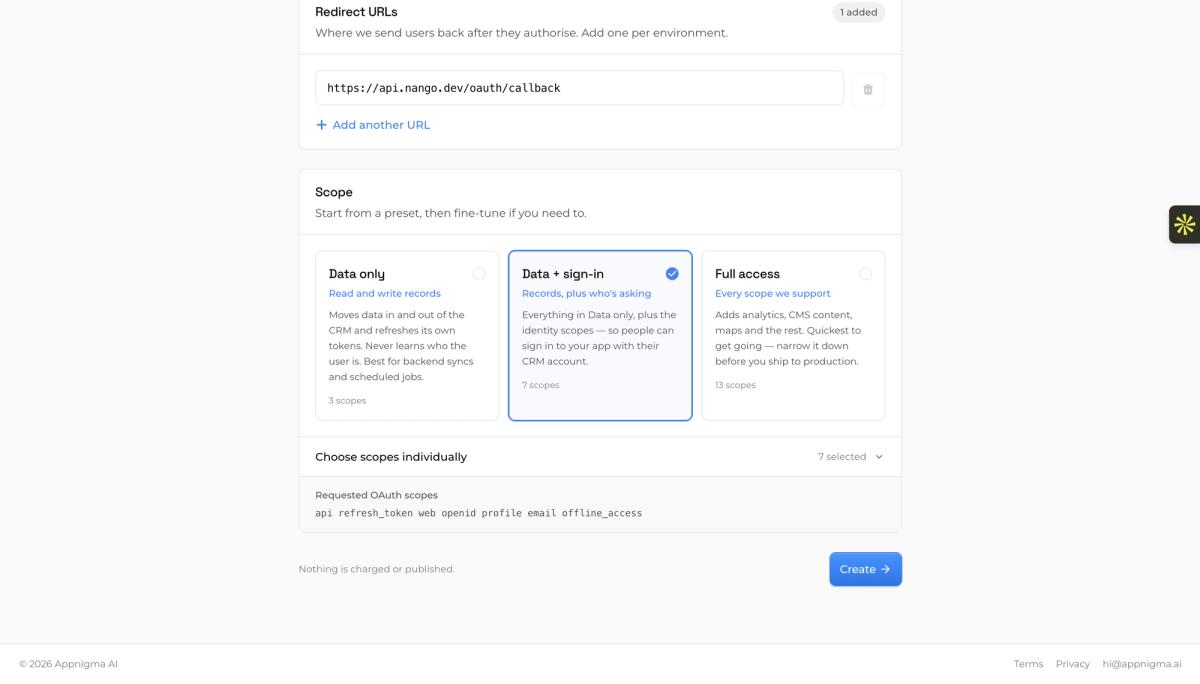
Take the middle preset unless you know you need more, and the reason is commercial rather than technical. Enterprise Salesforce admins review what your app is asking for. A request for analytics, CMS content and maps that your integration never calls is the kind of thing that stalls in a customer security review. Ask for identity plus data and you will clear more approvals.
Step 6: Collect your credentials
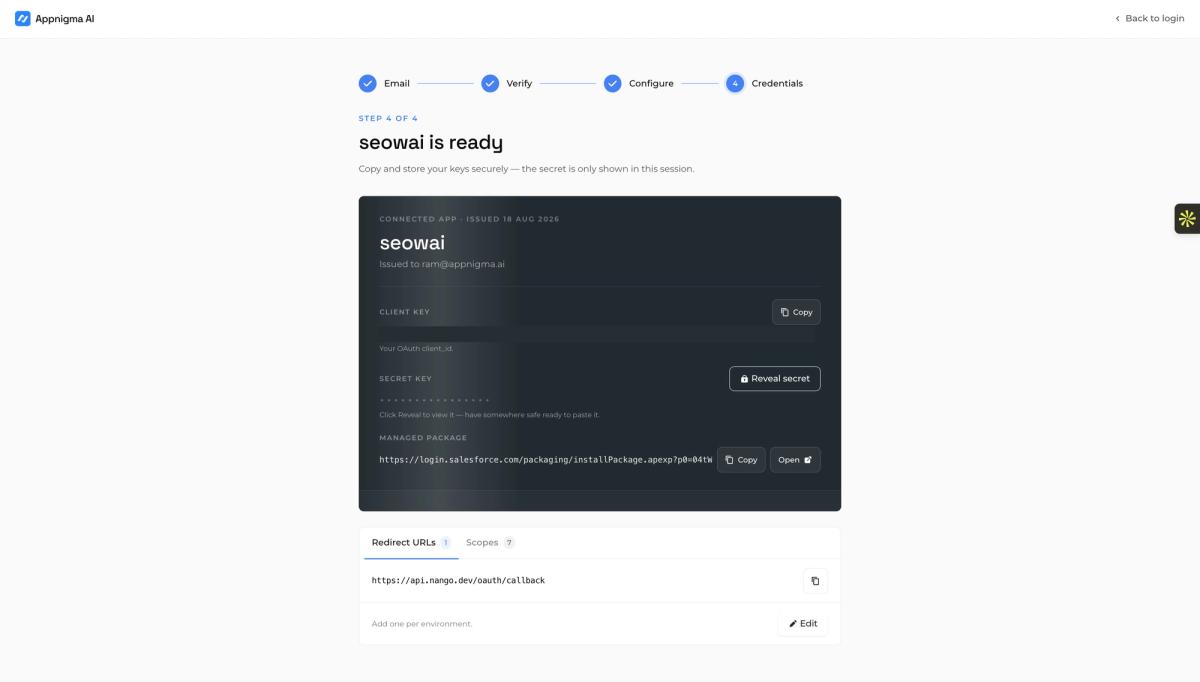
The app is provisioned and you land on the credentials screen with three things:
- Client key, which is your OAuth
client_idand what Salesforce calls the consumer key. - Secret key, hidden behind a Reveal control and only shown in this session. Have somewhere safe ready to paste it before you click.
- A managed package install link, a standard
login.salesforce.com/packaging/installPackage.apexpURL, ready to hand to a customer who needs the app in their own org.
That managed package link is the part worth pausing on. Building it by hand would otherwise mean enabling Dev Hub, registering a namespace, installing the Salesforce CLI, and cutting a package version yourself.
Step 7: Paste the credentials into Nango
Back in Nango, open the Salesforce integration settings and paste the client ID and client secret into the OAuth configuration. Save, then run a test connection.
Nango retrieves the instance_url from Salesforce automatically and stores it in the connection config, so you do not need to supply it. If you use the Nango Proxy, the correct API base URL is applied for you.
Token settings worth changing
One setting on the Salesforce side is worth knowing about even though it is not required to connect. Under the app's Policies, then OAuth Policies, then App Authorization, the Refresh Token Policy controls how long a connection survives. Nango recommends setting it to "Refresh token is valid until revoked" for long lived access.
Leave it on a shorter expiry and your syncs will keep dying at an interval nobody can explain, because the refresh token quietly expired rather than anything in your code breaking.
Troubleshooting
redirect_uri_mismatch. By some distance the most common failure, and the error text is not specific enough to help. It means the callback URL on the Salesforce side differs from the one Nango actually sends: a trailing slash, http instead of https, or a callback copied from a different Nango environment. Copy and paste, never retype.
invalid_client_id. A genuinely strange one, and worth knowing before it costs you an afternoon. Nango's troubleshooting notes that this error can be caused by the developer user's password containing special characters. If the client ID looks correct and it still fails, that is the thing to check.
Scopes decided twice. Teams pick full access to unblock a demo, ship it, then find a customer's security review will not approve it. Narrowing scopes afterwards means a fresh consent from every connected user. Pick the preset you intend to ship with before the first real customer connects.
Frequently Asked Questions
Does Nango work with Salesforce sandboxes as well as production?
Yes. Nango treats sandbox and production as separate integrations, because they are different hosts with different credentials. Create a separate external client app for each, or add both callback URLs to one app and keep the environments straight by name.
Do I really need two Salesforce orgs?
Only for packaged distribution, and only if you build the package by hand. The restriction is that a single org cannot both have Dev Hub enabled and hold a registered namespace, so packaging requires one of each. If you are only connecting your own org, one account is enough.
Is an external client app the same as a connected app?
They do the same job for OAuth and both give you a consumer key and secret. The connected app is the older org-level model; the external client app is the newer metadata-based replacement. Salesforce turned off connected app creation in the UI by default on new orgs in Winter '26, and from Spring '26 re-enabling it needs Salesforce Support.
Where do I find the Salesforce client ID and secret?
They are shown on the credentials screen as soon as the app is provisioned: the client key is your client ID, and the secret sits behind a Reveal control. If you build the app by hand in Salesforce instead, you find them on the app's Settings tab, under OAuth Settings, as the Consumer Key and Secret, after verifying your identity. Either way, the consumer key is the client ID.
Which scopes does Nango need for Salesforce?
At minimum api plus refresh_token or offline_access. Api lets Nango read and write records, and the refresh scope keeps the connection alive without sending users back through consent. Add the identity scopes if people will sign in with their Salesforce account.
Do I need the Salesforce CLI?
Only if you build the package by hand. If you provision the app instead, you do not need the CLI at all, because the managed package link comes with the app.
Can I change the redirect URL after the app is created?
Yes, and you should expect to. Redirect URLs are editable afterwards, so you can add a production callback alongside a staging one rather than provisioning a second app.
What is the managed package link for?
It is the install link for the packaged version of the app, for when a customer needs it in their own Salesforce org rather than connecting to yours. If you are only connecting your own org to Nango, you can ignore it.
Related Articles
- What is an external client app in Salesforce
- Connected app vs external client app compared
- Salesforce external client app OAuth flows
- What is a managed package in Salesforce
Sources
- Nango Docs, Salesforce API OAuth app setup: external client apps only, local and packaged distribution, environment setup, scopes, refresh token policy, invalid client ID troubleshooting. 2/ Nango Docs, API authorization configuration and callback URLs. 3/ Salesforce Help, External Client Apps. 4/ Appnigma, Salesforce External Client App product, flow and scope presets verified 18 August 2026.